Robotic Vacuum Cleaner (X8 Pro):

Robotic Vacuum Cleaner with Self-Empty Station (X8 Pro SES):

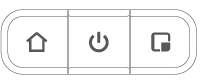
A. Front

|
Button |
Action |
|
|
Press to return RoboVac to the Self-Empty Station / Charging Base; press to pause / finish the current task when working |
|
|
Press and hold for 3 seconds to power on or off (when not in Charging status) Press to start Auto cleaning Press to pause / finish the current task when working |
|
|
Press to start Spot cleaning; press to pause / finish the current task when working |
|
|
Press and hold simultaneously for 5 seconds to reset the Wi-Fi connection. |


B. Side

C. Bottom

D. Charging Base (X8 Pro only)

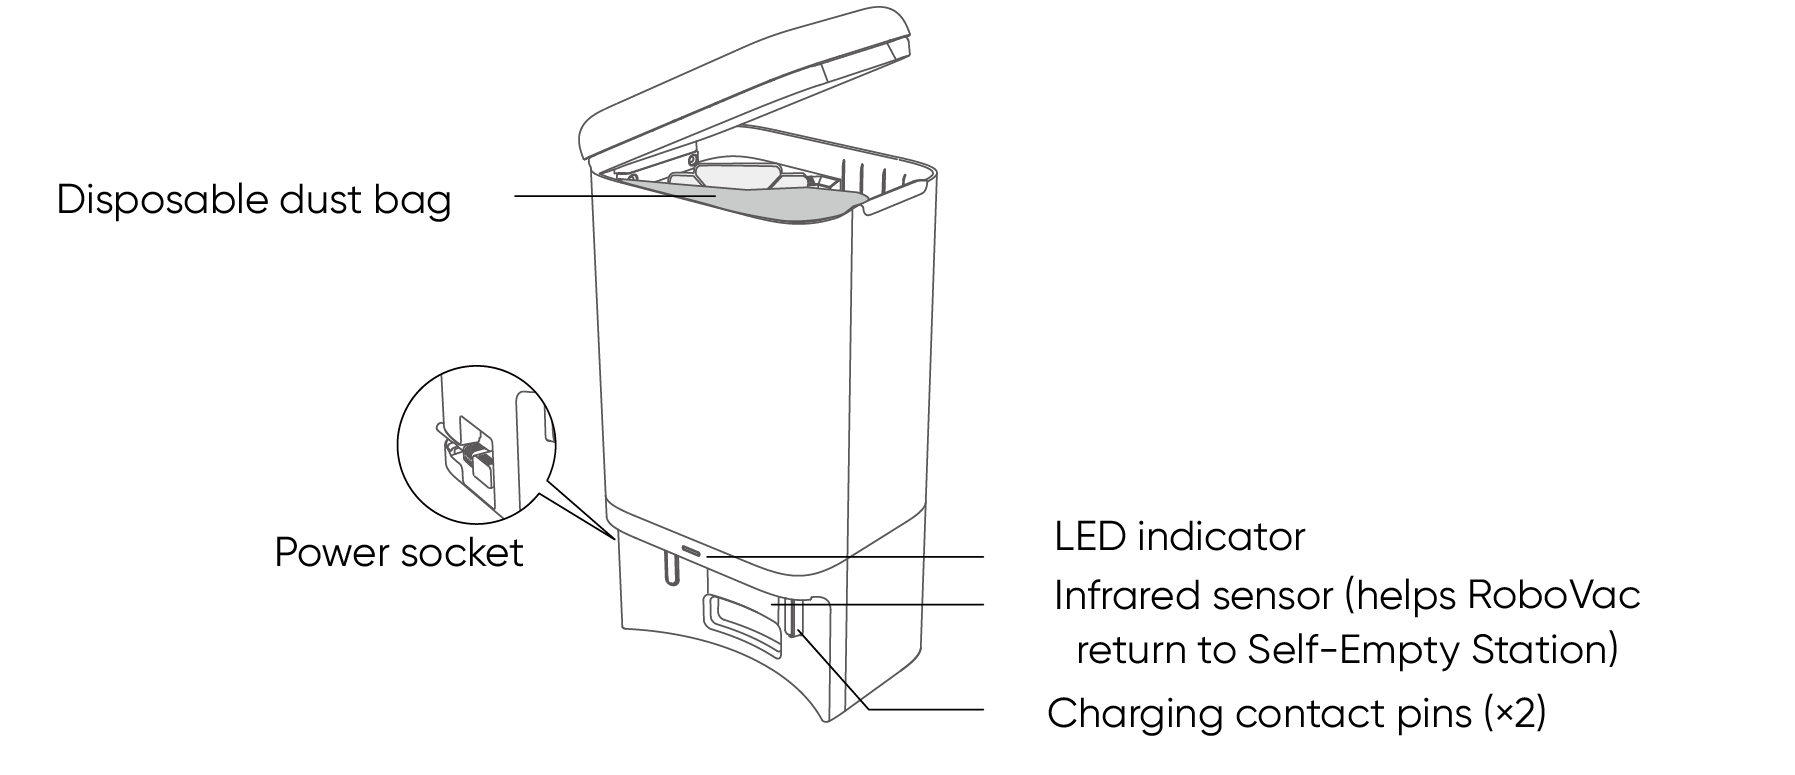
E. Self-Empty Station (X8 Pro SES only)
F. Mopping Module

You can see the status of RoboVac from the LED indicators.
|
Button |
LED Behavior |
Description |
|
|
Solid white |
Working normally |
|
Pulsing white (when attached to Self-Empty Station / Charging Base) |
Charging |
|
|
Flashing red |
RoboVac Error |
|
|
|
Solid white |
Returning to Self-Empty Station / Charging Base |
|
|
Solid white |
Spot cleaning mode |
|
|
Solid white |
RoboVac is powered on |
|
Off |
RoboVac sleeping mode |


Preparation
 Remove the foam blocks beside the bumper before use.
 Install the Self-Empty Station / Charging Base in a location that RoboVac can easily access. It is recommended to place it against a wall and on a hard, level surface.
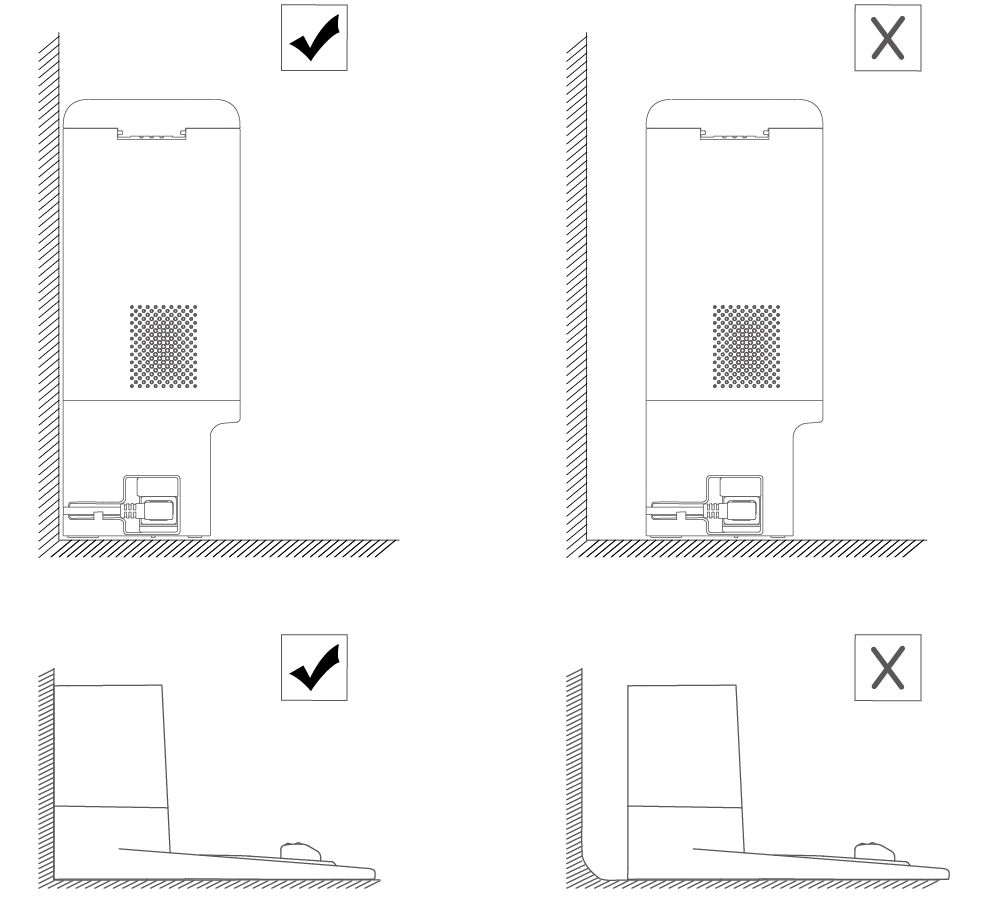

 It is recommended to remove objects within 1.6 ft / 0.5 m to the left and right sides and within 4.9 ft / 1.5 m of the front of the Self-Empty Station / Charging Base. If you cannot remove the objects, move RoboVac to a new place and check whether RoboVac can return to the Self-Empty Station / Charging Base normally; if not, contact us at support@eufy.com for suggestions.

 Connect the power cord to the Self-Empty Station / Charging Base and a wall outlet.
 When the Self-Empty Station / Charging Base connects to AC power, the LED indicator on it will be solid white.


Method 2: Press  on the main unit or tap the icon in the eufy Clean app to send RoboVac to the Self-Empty Station / Charging Base.
Auto Recharge and Resume
•RoboVac returns to the Self-Empty Station / Charging Base automatically to recharge when:
•RoboVac has finished cleaning;
•Cleaning is not complete and the battery level becomes low; once recharged to 80% battery capacity, RoboVac will resume and finish the remaining cleaning.

Press and hold  for 3 seconds to power RoboVac on or off.

2.4 Use Your RoboVac with the eufy Clean App
To enjoy all the available features, it is recommended to control your RoboVac via the eufy Clean app.
Before you start, make sure:
•Your smartphone or tablet is running iOS 11 (or above) or Android 8.0 (or above).
•The 2.4GHz band wireless signal is enabled on your wireless router.

Download the eufy Clean app from the App Store (iOS devices) or Google Play (Android devices), or by scanning the QR code.
 Open the app and create a user account.
Tap the “+” icon to add RoboVac to your eufy Clean account.
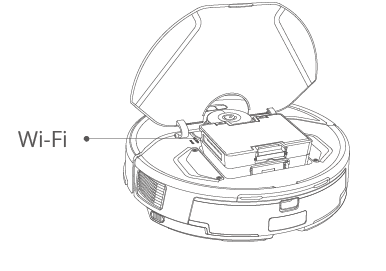
Follow the instructions in the app to set up the Wi-Fi connection.
 After connecting successfully, you can control RoboVac via the app.
With the app, you can select cleaning at your desired suction level, schedule cleaning, view the cleaning map, set up “No-Go” zones, check the network connection status, and access additional features.
|
Wi-Fi indicator |
Slowly flashing blue |
Waiting for connection |
|
|
Rapidly flashing blue |
Connecting with your wireless router |
|
Solid blue |
Connected with your wireless router |


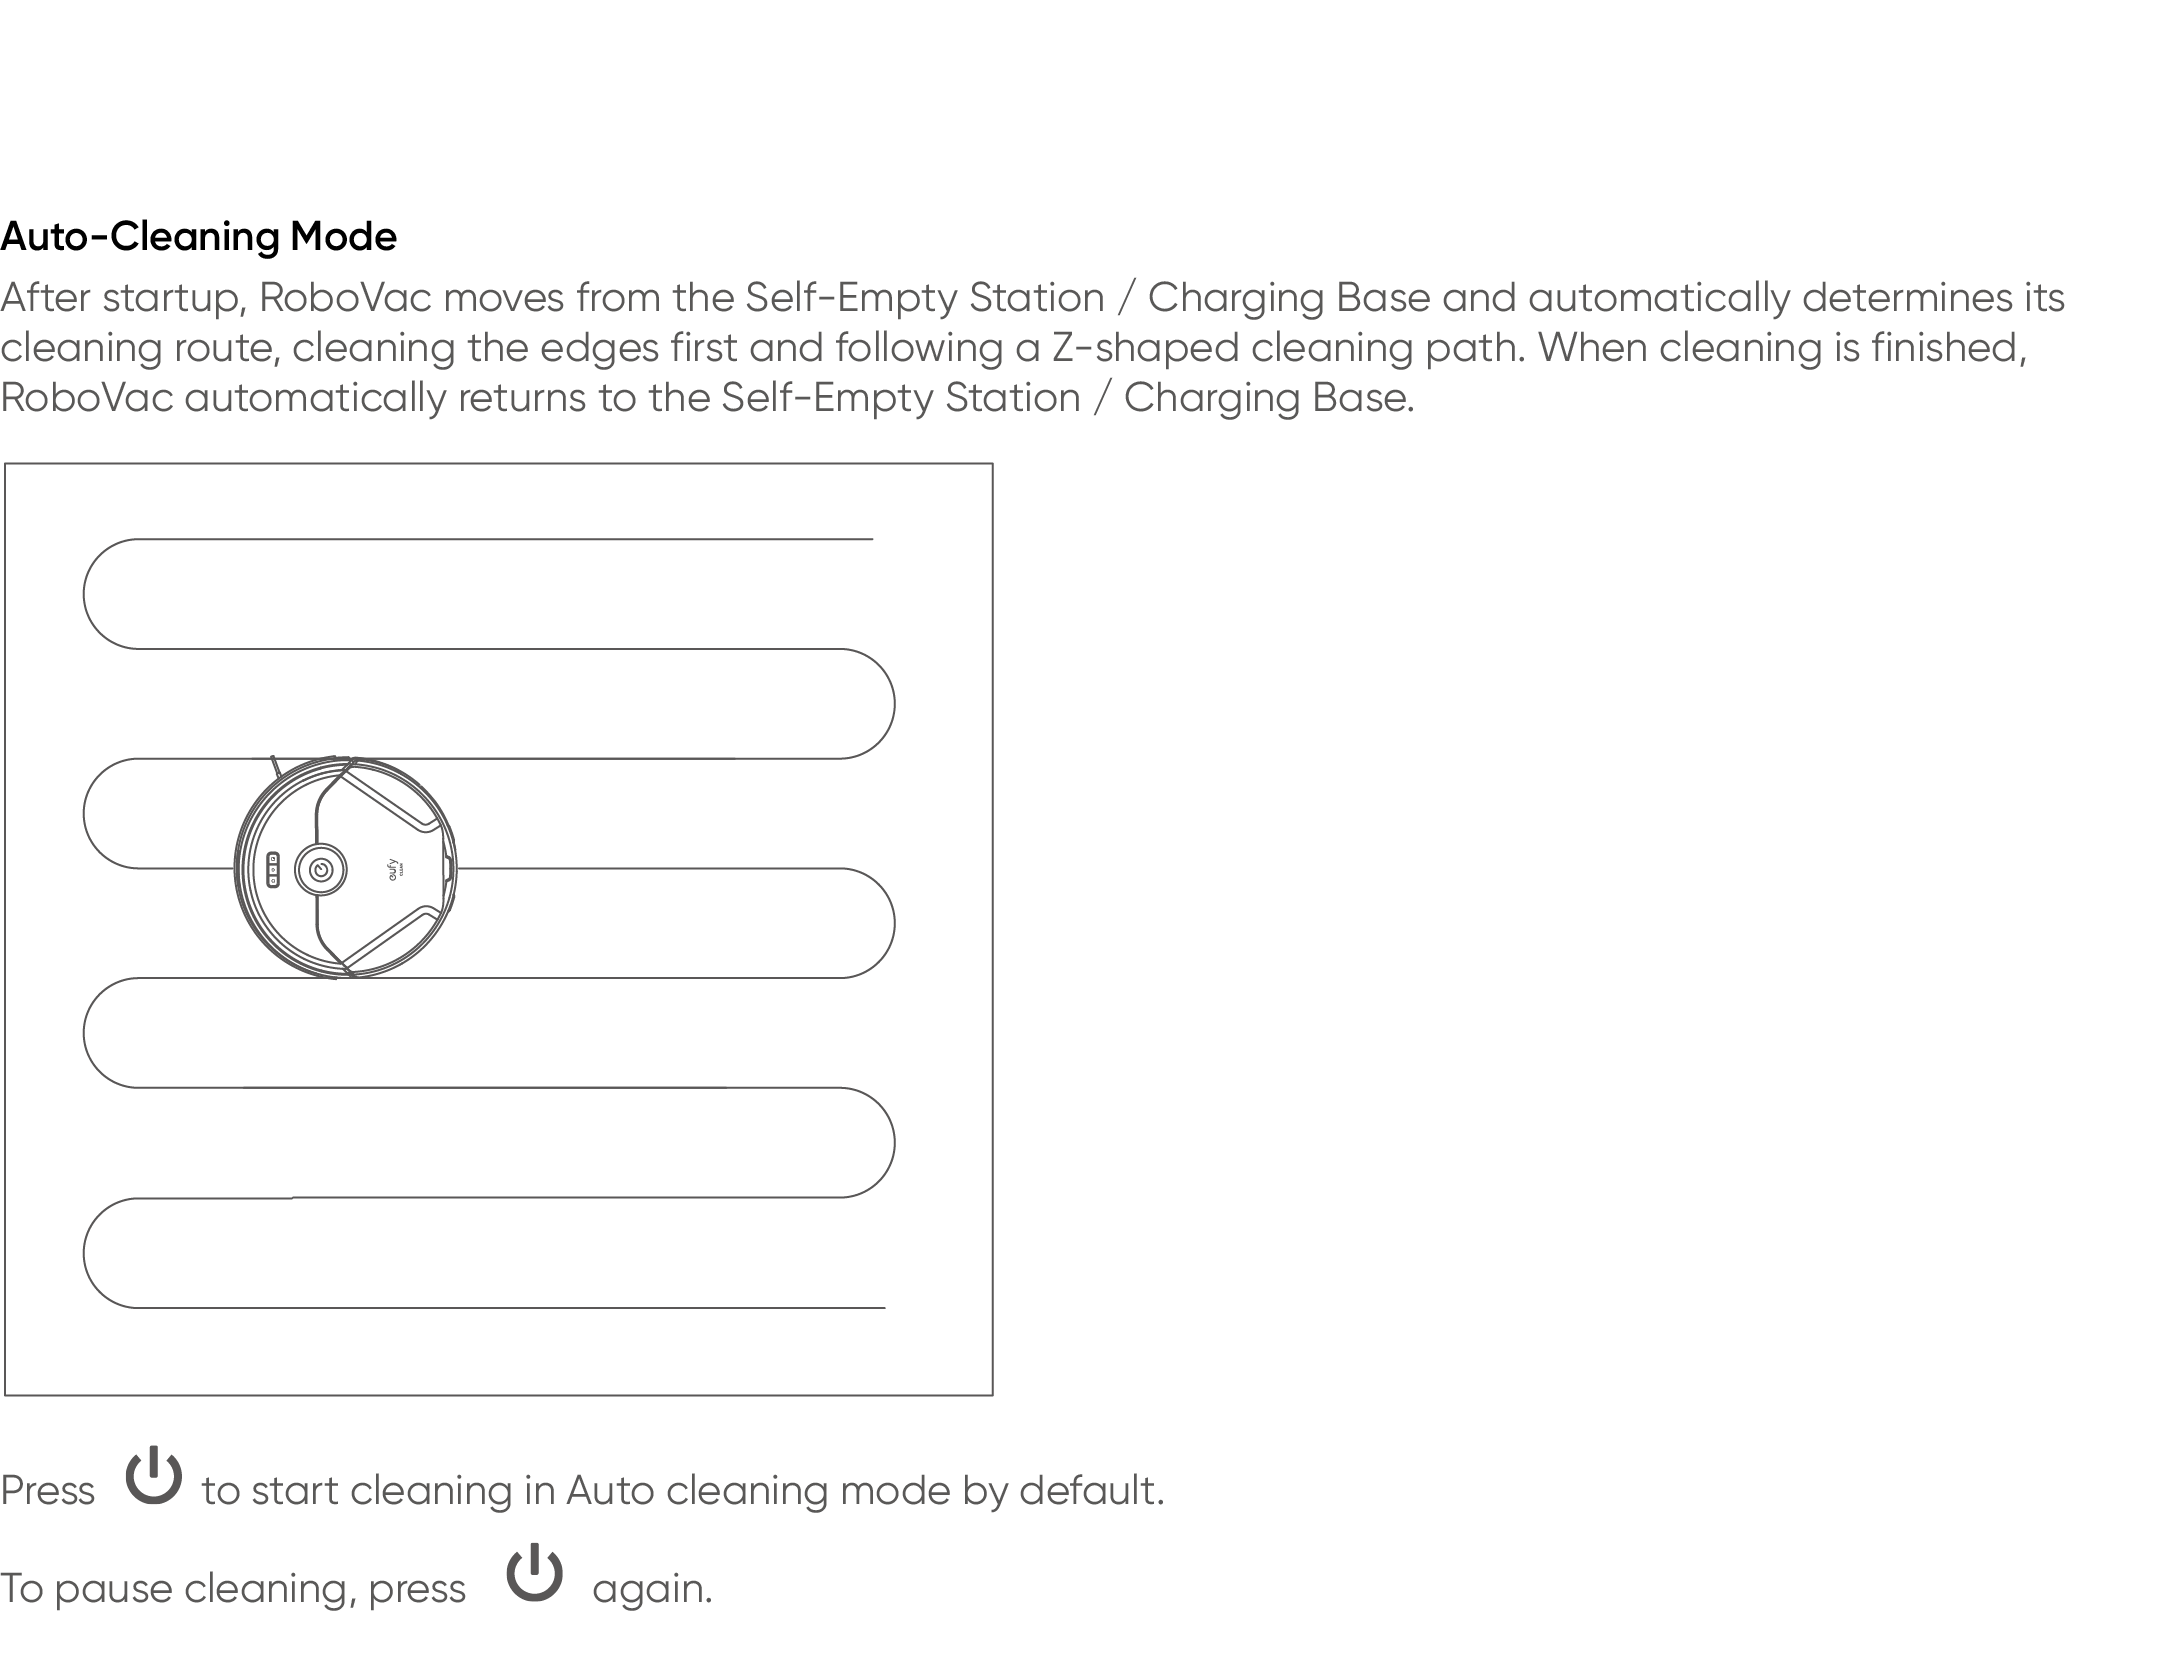
Spot Cleaning Mode
RoboVac intensively cleans a specific area with a size of 4.9 ft × 4.9 ft / 1.5 m × 1.5 m, useful if there is a concentrated area of dust or debris. When the cleaning of a certain zone is finished, it automatically returns to the Self-Empty Station / Charging Base.
•Press  on RoboVac to start cleaning in Spot cleaning mode.

Room Cleaning Mode (available via the eufy Clean app only)
In this mode, your house is automatically divided into several rooms for cleaning in the eufy Clean app. You can also customize your room settings in the app. RoboVac will clean the selected rooms only and return to the Self-Empty Station / Charging Base after cleaning.

2.6 Select a Suction Power Level
In the eufy Clean app, select a suction power level according to your needs: Quiet, Standard (Default), Turbo, and Max.
 Select BoostIQ™ Feature
In the eufy Clean app, select the BoostIQ™ feature according to your needs. RoboVac will automatically increase suction power if it detects that stronger power is needed to ensure the best clean. BoostIQ™ is ideal for cleaning thicker carpets and hard-to-sweep messes, which will reduce the total cleaning time but increase the noise level. If the vacuuming noise caused by BoostIQ™ disturbs you, you can disable this feature.
Before mopping, peel off the stickers on the waterproof pad and install it under the Self-Empty Station / Charging Base. Make sure the waterproof pad is firmly attached to the floor.

Remove the water tank from the main unit. Open the water inlet cover to fill the water, then close the cover.


Install the water tank back into RoboVac.

Remove the mopping cloth from the mopping module.

 Wet the mopping cloth and wring out excess water. Slide the mopping cloth all the way back onto the slot of the mopping module and stick it firmly.

 Install the mopping module at the bottom of RoboVac until a click is heard.

 Start cleaning. RoboVac will automatically vacuum and mop. During mopping, you can choose among three water levels via the eufy Clean app.
 When RoboVac finishes cleaning, remove the water tank, empty any remaining water, and clean the mopping cloth to prevent mildew or unpleasant smells. For how to clean and maintain the water tank, refer to the “Cleaning and Maintenance” section in this manual.

2.8 Use RoboVac with Amazon Alexa / The Google Assistant
Amazon Alexa or the Google Assistant are smart voice control devices that enable you to control RoboVac with your voice.
Before you start, make sure:
•RoboVac is attached to the Self-Empty Station / Charging Base to ensure there is enough power.
•RoboVac is connected with the eufy Clean app.
•You have an Amazon Alexa-enabled device (i.e. Amazon Echo, Echo Dot, Amazon Tap, Echo Show, or Echo Spot) or a device enabled with the Google Assistant (i.e. Google Home, Google Home Mini). These devices are sold separately.
•The Amazon Alexa app or Google Home app is already installed on your smart device, and you have created an account.
To control RoboVac with Amazon Alexa or the Google Assistant:
•Open the eufy Clean app and find “Smart Integrations” in the top left.
•Follow the on-screen instructions to complete the setup.
2.9 Set Up Virtual Wall (Available on the App Only)
With the eufy Clean app, you can set up a "No-Go Zone", "No-Mop Zone", or "Virtual Wall" as a restricted area. This eliminates the need to use physical barriers, including boundary strips. This feature is only designed for dividing the cleaning zones, not for isolating hazardous areas.
•No-Go Zone: RoboVac will not enter the zone to vacuum.
•Virtual Wall: RoboVac will not cross the virtual wall.
•No-Mop Zone: RoboVac will not enter the zone to mop.

Prior to cleaning and maintaining, power off the device and unplug the power cord. Any other servicing should be performed by an authorized service representative.
For optimal performance, follow the instructions below to clean and maintain RoboVac regularly. The cleaning and replacement frequency will depend on your RoboVac usage habits
Recommended Cleaning and Replacement Frequency
* Information stated in the following table is for reference only. The actual cleaning and replacement frequency depends on the environment of your home and your cleaning needs.
|
RoboVac Part |
Cleaning Frequency |
Replacement Frequency |
|
Dust Box |
Once a week (X8 Pro SES only) After each use (X8 Pro only) *To reduce the dust box cleaning frequency of X8 Pro, it is recommended to purchase the Self-Empty Station. |
- |
|
Dust Bag (X8 Pro SES only) |
Timely check and empty the dust bag if you have a pet |
Every 60 days |
|
Water Tank |
After each use |
- |
|
Mopping Cloth |
After each use |
- |
|
Filter |
Once a week |
Every 3 months |
|
Filter of Self-Empty Station |
Every 2 months |
- |
|
Side Brush |
Once a month |
Every 3-6 months (or when visibly worn) |
|
Brush Guard |
Once a month |
Every 3-6 months (or when visibly worn) |
|
Rolling Brush |
Once a month |
Every 6-12 months |
|
Sensors |
Once a month |
- |
|
Charging Pins |
Once a month |
- |
|
Swivel Wheel |
Once a month |
- |
3.1 Clean the Dust Box and Filter


Foreign substances, such as hair, can easily get tangled in the side brush, so it is best to clean it regularly.
Remove the side brush.
Carefully unwind and pull off any hair or substances that are wrapped between the main unit and the side brush.
Clean the side brush with water.

3.4 Clean the Sensors and Charging Pins
To maintain the best performance, clean the sensors and charging contact pins regularly.
•Dust off the sensors and charging contact pins using a cloth or cleaning brush.

Hair or dust particles can easily get entangled in the swivel wheel. Be sure to clean the swivel wheel periodically and as needed.

Pull out the swivel wheel with a tool (such as a screwdriver).
Clean any hair or debris wrapped around the wheel or entangled inside the wheel cavity.
 Reinstall the wheel and push it in until it clicks into place.

3.6 Clean the Mopping Cloth and Water Tank

After each use, remove the mopping cloth and the water tank.
 Rinse the mopping cloth and water tank thoroughly with water.
Air-dry the mopping cloth completely to prevent mildew or unpleasant smells.
3.7 Replace the Dust Bag (X8 Pro SES Only)

Lift open the top cover.
Pull the release button to position, then pull up the handle to remove the dust bag.
Discard the used dust bag.
Properly install the new dust bag by sliding its paper board into the slot until a click is heard.
Here are just a few preliminary suggestions. If your problem persists or if you need further troubleshooting information, please visit https://support.eufylife.com, go to the eufy Clean app, or contact support@eufy.com for help.
|
Problems |
Solutions |
|
RoboVac will not turn on. |
•Press and hold •Make sure the battery is fully charged. •If it still has no response, turn RoboVac off and then turn it back on. |
|
RoboVac suddenly stops working. |
•Check if RoboVac is trapped or stuck on an obstacle. •Check if the battery level is too low. •If your problem persists, turn RoboVac off, wait for 2 seconds, and then turn it back on. •Check if RoboVac has alerted you with any voice prompts or LED indicators. |
|
RoboVac's movements or travel paths are abnormal. |
•Clean the sensors carefully with a dry cloth. •Restart RoboVac by turning RoboVac off and on. •Check if the mopping module is installed when RoboVac is cleaning rugs or climbing over objects. If so, remove the mopping module and try again. |
|
You cannot schedule cleanings. |
•Make sure the scheduled time has been set correctly. Check if the time zone in the eufy Clean app is consistent with that on your mobile device. •Make sure RoboVac is turned on and the battery is fully charged. Cleaning schedules are erased when RoboVac is powered off. If RoboVac is turned on without Internet access, cleaning schedules will not synchronize and must be reset via the app. |
|
Suction power is weak |
•Check if any obstructions are blocking the suction inlet. •Empty the dust box. •Check if the filter is wet due to water or other liquid on the floor. Air-dry the filter completely before use. •Check if the brush guard is correctly installed. •Check the suction power level previously selected in the eufy Clean app. Adjust the setting if necessary. •Check if the filter is blocked by excess dust or hair. If so, use the cleaning tool to clean the filter and wash it thoroughly with running water. Air-dry the filter completely before use. |
|
RoboVac cannot return to the Self-Empty Station / Charging Base. |
•Remove objects within 1.6 ft / 0.5 m to the left and right sides and within 4.9 ft / 1.5 m of the front of the Self-Empty Station / Charging Base. •Make sure the Self-Empty Station / Charging Base is not placed on carpets. •Check if RoboVac is stuck on any objects. •Clean the charging contact pins. |
|
RoboVac cannot connect to a Wi-Fi network. |
•Make sure you entered the Wi-Fi password correctly. •Make sure your RoboVac, router, and phone are close enough to ensure a strong signal strength. •Make sure your Wi-Fi router supports a 2.4GHz and 802.11b/g/n band; a 5GHz band is not supported. •Reboot RoboVac and your router. •Try connecting RoboVac to a Wi-Fi network with another phone. |
|
You cannot control RoboVac with Amazon Alexa. |
•Check if there are any Internet connection problems. •Check whether you have installed the Amazon Alexa app onto your smart device and enabled “eufy Clean - RoboVac” Skill in the Amazon Alexa app. For details, refer to the “Smart Integrations” page in the eufy Clean App. •Make sure you have a eufy Clean account and have connected to RoboVac. •Make sure you are using the correct Alexa voice commands. |
|
RoboVac cannot be charged. |
If the indicator on the Self-Empty Station / Charging Base lights up: •Dust off the charging contact pins with a dry cloth. •Check if there is any physical damage on RoboVac or the charging pins of the Self-Empty Station / Charging Base. •Check if you can hear the “Charging” voice prompt when RoboVac is attached to the Self-Empty Station / Charging Base. •If the indicator on the Self-Empty Station / Charging Base does not light up: •Reconnect the power cord with the Self-Empty Station / Charging Base and try a new power outlet. If the problem persists, replace the Self-Empty Station / Charging Base. |
|
You cannot control RoboVac with the Google Assistant. |
•Check if there are any Internet connection problems. •Check if you have installed the Google Home app onto your smart device and initiated the “eufy Clean” action in the Google Home app. For details, refer to the “Smart Integrations” page in the eufy Clean App. •Check if you are using the proper commands when talking to the Google Assistant. When making your request, start by saying the wake phrase “Ok Google”. •Repeat your question. Speak clearly to the Google Assistant. |


|
Input |
20V |
|
Battery |
14.4V / 5,200mAh lithium battery |
|
|
Dust Box Capacity |
335ml |
|
|
Water Tank Capacity |
270ml |
|

|
Rated Power Consumption |
650W |
|
(For X8 Pro SES) |
||

|
Input |
20V |
|
(For X8 Pro) |
 1.2A
1.2AContact Us
|
|
support@eufy.com |
|
|
www.eufy.com |
|
|
(US/CA) +1 (800) 994 3056 (UK) +44 (0) 1604 936200 (DE) +49 (0) 69 9579 7960 (日本) +81 03 4455 7823 |


